 To begin with I had to open up After Effects, and then create a new project, including a new composition. When I created a new composition I had to put in a few settings that we got told that we had to use, for example the size which was....
 I then had to start with a black screen, which would allow me to fade into my animation. I also wanted to have the background as black (or dark grey), this is so I can show the spotlights, which I wanted to use to create the staging for my animation. The way I made the background back was by using the composition settings and changed the colour to black. I then created a new solid, which would allow me to have a fade in, I right clicked within the areas where all of the layers are and then selected New/Solid, this is where I could change the colour and the size of the solid, and in this instance I wanted to have it the same size as my animation screen.
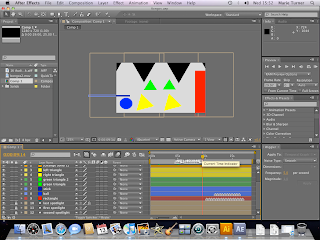
 Here are all of the layers and objects that I had created to get my animation.
 I first began with creating the first objects that would be seen, which were the first spotlight and the 2 yellow triangles. The way I created the spotlight was to have a mask of a triangle over the background colour. The only way of creating a triangle was to use the star mask tool and then by pressing on the down arrow key (on the keyboard) I was able to limit the number of points to 3, which consequently created my triangle. I then used the same technique with my yellow triangles, except the way I did this was to first create a new solid, then using the star masking tool I created the triangles.
 The first action I wanted them to do was sway from side to side to each of the beats, and the way I created this was by using the rotation tool and moving the slider along the time line at each of the places that I wanted the triangles to hit each of the beats. However when I showed my initial design to my tutors, they pointed out that there was a big gap from when the music began to when the movement began, therefore I decided to have the triangles walking towards the front of the scene, however to making it a bit comical I decided to have one come in a little later then the other one, to emulate that one was late and therefore trying to catch up so they do not miss the start.
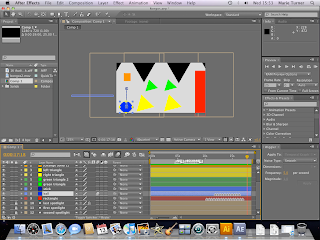
 I then want to have another spotlight lighting up the second solid that will be creating another section of the music, therefore I duplicated the original spotlight and changed the position, and to make it come on when I wanted it to, I used the opacity tool on it (making it 0%), and using keyframes, I placed the slider where I wanted the spotlight to come on, however if I kept it like that with only one keyframe I found that the opacity would change gradually, therefore I added another keyframe just before the 'on' keyframe and I made the opacity 100%.
To make the rectangle move to the beat and making it bang at the moments I wanted it to bang, I had to again use the rotation tool on it, however I changed the position of the ancor point to the bottom of the triangle to make it look like it was in a fixed position and could only move the top.
 I then had the third spotlight appear, when the last bang sounded, and this revealed a ball, as well as 2 other triangles abover the original triangles. The ball would create the beat for the second part of the song. However, I did have an issue, because in real life a ball doesn't start bouncing by itself therefore I thought about having a stick come in and tap it to make it bounce to the beat. The green traingles where also part of the second section of the music, this is because I found that there were to different bongo noises at that point, which then made me add in these other triangles to allow for the other bongo sounds to seem like they are being created by another object(s).
 To make the ball more realistic, I had to use the principle squash and stretch. Basically, I used the scale tool, the position tool, and the slider to make my ball seem real as it bounced. To begin with, when the ball hit the bottom of the screen I made it squash and as it fell and raised I made it stretch, and then only point that the ball would be normal size is at the top before the ball began to fall.
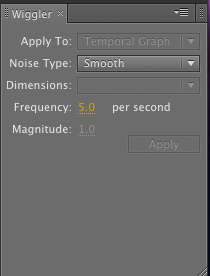 The way I used this tool was to select the 2 points from my position section, and then select how many times I wanted the object to shake per second, I also had to select how much I wanted it to shake. To get the square shaking perfectly I had to experiment, until I got the right settings

 I then had the third spotlight appear, when the last bang sounded, and this revealed a ball, as well as 2 other triangles abover the original triangles. The ball would create the beat for the second part of the song. However, I did have an issue, because in real life a ball doesn't start bouncing by itself therefore I thought about having a stick come in and tap it to make it bounce to the beat. The green traingles where also part of the second section of the music, this is because I found that there were to different bongo noises at that point, which then made me add in these other triangles to allow for the other bongo sounds to seem like they are being created by another object(s).
 To make the ball more realistic, I had to use the principle squash and stretch. Basically, I used the scale tool, the position tool, and the slider to make my ball seem real as it bounced. To begin with, when the ball hit the bottom of the screen I made it squash and as it fell and raised I made it stretch, and then only point that the ball would be normal size is at the top before the ball began to fall.
At the end of my selected music I had a section which I need to have something else to create the sound, I therefore thought that as I am using the primary shapes I would use a square. I wanted the square to move upwards, grow and shake all at the same time, because this would fit to the music. Therefore I had to use the scale tool, to make it grow, the position tool to make it go upwards. I then got taught how to use the Wiggler. This allowed me to make it shake.
The way I used this tool was to select the 2 points from my position section, and then select how many times I wanted the object to shake per second, I also had to select how much I wanted it to shake. To get the square shaking perfectly I had to experiment, until I got the right settings
Here is my when I imported it into quick time.
No comments:
Post a Comment