I first used Audacity to cut up my music and this allowed me to sut it up very specifically to where the music faded in and out easily.
 I had to use my storyboard at which was in my sketchbook to create this idea. I first began with a single black line, which I placed in the middle of the screen. This black line would allow me to have the objects use it as a way to emulate that the objects are creating the sounds. The way I created the black line was by creating a new solid, and then changing the size of it by using the cursor and the corner, and then dragging the corner inwards until the black line was the size that I wanted.
 This particular song is quite hard to determine where each of the sounds are, therefore I had to extend the music layer to allow me to see the wavelengths, which then allowed me to point out all of the different sounds by both looking at the music and listening to it at the same time.
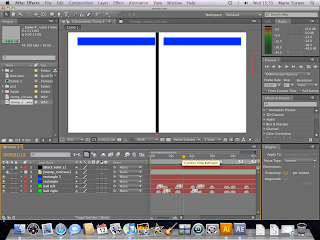
To make the first sounds that the audience hears I used to rectangles that would come from each side of the screen and bang into the black line when the beat would sound. I also wanted them to be more realistic in their movements, therefore I decided to have the rectangles bounce against the edge of the animation, and then pull back, which would then show anticipation.

 Here is a screen shot of my video after being rendered to a Quick Time movie.
The way I was able to mark out the places where my objects would banging together was by using the wavelengths, and listening to the music at the same time. Then by pressing on the star key on the keyboard, these small markers would appear on the timeline, and this was a great deal better then guessing, this also meant I didn't have to listen to the song over and over again, I would have all of my markers worked out, and this allowed me to get more done quickly.
I then had to created my balls that would come out from either side and use the black line as a wall and bounce off of it, creating the sounds. I began by first creating a new solid, and then using the circle mask tool I created a circle. I used balls for the sound because I felt that they would be the best and emulating the sound, as well as they could move at the correct speed.
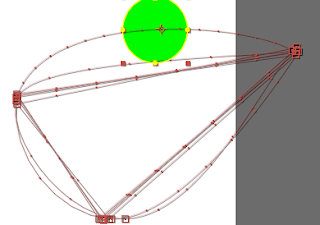
Here are the paths that the same ball would take. As you can see there are 2 paths that are rounded and the others are straight, which was not what I wanted. I therefore decided to copy the keyframes from the first loop, and then I pasted them in the places where I wanted my balls to bounce. (I also did this on the ball on the other side as well).
I then found again I would have to use squash and stretch to make my balls more realistic. so when my balls hit the wall and the floor they would squash and then within the places in between they would stretch.
I then got suggested by one of my tutors that I should maybe have the balls changing colour alternately. Therefore I duplicated the 2 ball layers to make 2 exact copies and then I would have one of the balls (from each side) one colour and the other another colour, this would then be seen as the balls changing colour each time they went off screen and then back on screen.
I also tried to put a motion blur on the balls, however, due to the speed at which they were travelling in, they looked better without the blur, mainly because the motion blur made them look too blurry.
I also used the Wiggler with this animation as well as the Bongos animation, I used it when the 2 blocks from the top and the 2 blocks from the bottom came together in the middle, this would make them look clunky, which was my goal, because the movements fitted with the song that I had chosen. I again had to experiment first, because then I could get the movement perfect to the section of the song that I had chosen.
 Here is a screen shot of my video after being rendered to a Quick Time movie.
No comments:
Post a Comment