Sunday, 17 October 2010

Evaluation

To begin with I have found this project to be interesting and I have really enjoyed it.
I have seemed to get on well with After Effects, and I feel I have used a wide range of different effects and techniques to create my 3 animations.
I feel I have worked well given the time that we were given, and given the fact that I did not have After Effects at home, also I have used my time well, getting everything done before the deadline day. Which allowed me to come in earlier, and finesse my work, before my 'Crit' Session.

In regards to my animations, I am very happy with all three of them, this is because I have worked hard on them to make sure they match the brief, to the best of my ability.
I also like the fact that they all have similar types of music (objects making the sounds), this is because I was able to use a range of different techniques to make them different and original.


My Varese Animation


Here is my third finished animation, which I have again rendered into a Quick Time movie.
I feel that the colour scheme of this idea work because the music is from the 1920's and therefore the films would be in black and white, so I wanted to emulate that. Moreover, I wanted to make one of animations different from the others and I felt that I have achieved that.
The movements of this animation are flowy and simple because the music is fairly simple and flowy, however, there are places where the music is a bit choppy and thereofre I have used choppy movements.
I feel that this animation works well with the theme of the music that I have chosen.

The principles that I have used are:
  • Speed of Change
  • Timing
  • Arcs
  • Motion Blur
  • Squash and Stretch
  • Motivation/Anticipation
  • Follow Through
  • Overlapping Actions
  • Staging/Exaggeration

My Bins Animation


Here is my finished Bins Animation, I have rendered it out into a Quick Time movie.
I feel that I have used the Bongo Animation to my advantage, because I was able to learn from it and then adapt this animation to make it better.
The colours work well, because first I got the swatches from Kuler, therefore I was able to use authentic colours, which would go with the theme of my music.
The movements that I have chosen are jagged, this is they way I wanted it because the music is very clangy and metallic and therefore it fits in with the theme again.
All in all I feel that this animation fits the brief that had been set.

The principles that I have used are:
  • Timing
  • Speed of Change
  • Arcs
  • Squash and Stretch
  • Motivation/Anticipation
  • Follow Through
  • Overlapping Action
  • Staging/Exaggeration

My Bongo Animation


This is my final Bongo Animation, which I have rendered into a Quick Time movie.
I feel for this animation after changing the colours I feel that the idea works well, in comparison to when I had the primary colours.
The lighting problem that I had, at the beginning, was that the beams of light did not look like spotlights, therefore to solve that problem I found a lighting effect that I had put onto the triangles, and once I did this I found that they then looked like spotlights.

The Principles that I have used are:
  • Squash and Stretch
  • Motion Blur
  • Motivation/Anticipation
  • Overlapping Action
  • Staging/Exaggeration

Sunday, 10 October 2010

Colours

To begin with I was going to use the primary colours, because this would have gone with the primary shapes that I have used.
However, after showing my animations to my tutors they pointed out that using the primary colours didn't really fit with the themes of the music, therefore after doing a bit of research I had to change the colours to ones that fitted.
I found all of these colour swatches from http://kuler.adobe.com/.

The first one that I chose for my Bongo Animation was called Bongo. I felt this colour swatch was best because there are natural colours, with a light blue which is what I wanted.
These 2 (above and below) I found to use for my Bins Animation. I chose these 2 because the music is from a group called Stomp, who use physical bins to create the music. Therefore I used bin like colours for my animation.
And for my Varese Animation I have used grey scale colours, with black and whites. As well as a bronzey colour. I chose these colours because I wanted this animation to be a bit different in comparison to the other 2 animations. As well as the song, Hyperprism, had been created in 1923 and the other 2 are more recent.

Friday, 8 October 2010

Production Log for Hyperprism Animation

To begin with I decided to chose Edgar Varese because in comparison to my other 2 animations this shows a different style, however still inkeeping with my theme of music being created by different objects and sounds.


With this animation I first had to cut up the music, which would allow me make my animation easier. I did this by using Audacity. I first opened the original music within Audacity, I then found my section of music, I then selected it and I cut it out of the original, I did this by pressing Apple+X on the keyboard (which is a short cut for Cut). I created a new file for me to paste the section of music into. I then exported it as an .wav, which is a format that After Effects can work with.

Here the section of music I selected for my third animation, and using the wavelengths I will be able to figure out the points, which I will need to make object move.

I first made my objects in Illustrator, this is because I wanted to have gradients on them, this is so I can make this animation seem like an older version of the other animations, (by using greyscale and black and white, like old films). I first began with the star in the middle of my screen, emulating a singer or something similar. To create the movements from my storyborad in After Effects, I had to use the Puppet tool.

The puppet tool allowed me to pin down the points I did not want to move and I did want to move. I started by pinning down each of the points of the star. I then dragged the 2 side points upwards, as well as moving the slider to the point at which I wanted the star to move to.
I made sure that I moved the star to the sounds of the trumpets, so that it would make it look like the star was make the trumpet sounds.
I used the Wiggler again for this animation, this is so at the time when the maraca sounds were played the straight line across the screen would vibrate, which in turn would make the balls that were on it, at the beginning, roll off and create the drumming sounds. However, instead of making both balls bounce I thought that instead I would make the smaller one bounce to the faint drum beat after the bigger one fell like a connonball. And making the bigger one like a cannonball will mean that the audience could tell the difference in the sounds.
I did have trouble with what I was going to do in the middle of my music where there were many different sounds, mainly because I couldn't think of a simple yet interesting way to pull it off. I then thought of objects falling on top of each other creating something like a totem pole, and so to everything sound (which in the end turned out to be about 7 sounds), I had objects falling and then landing on top of the last object that fell.
I then used the straight line to push of the top 2 blocks, in time with the music.
After having created my star I decided to create a duplicate star, which at the end will steal the spotlight from the bigger star. However, I found that to begin with having to 2 stars the same colour didn't make the second one stand out as much as I would like, therefore thought that I could change the colours or tones of the second star to make it stand out.
This is the tools at which helped me change the colours. I chose the colour that I did because in older films, tey started in black and white and then started changing to a bronzey sort of colour.

Production Log for Bins Animation

I changed my mind on the timings because I felt that I could do more with this last section I have picked. It is between 1 minute 18 seconds to 1 minute 34 seconds (1:18 to 1:34).
I first used Audacity to cut up my music and this allowed me to sut it up very specifically to where the music faded in and out easily.

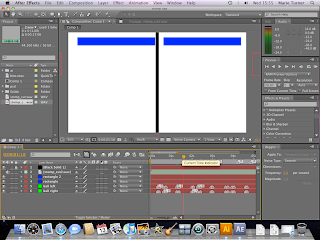
I had to use my storyboard at which was in my sketchbook to create this idea. I first began with a single black line, which I placed in the middle of the screen. This black line would allow me to have the objects use it as a way to emulate that the objects are creating the sounds. The way I created the black line was by creating a new solid, and then changing the size of it by using the cursor and the corner, and then dragging the corner inwards until the black line was the size that I wanted.

This particular song is quite hard to determine where each of the sounds are, therefore I had to extend the music layer to allow me to see the wavelengths, which then allowed me to point out all of the different sounds by both looking at the music and listening to it at the same time.
To make the first sounds that the audience hears I used to rectangles that would come from each side of the screen and bang into the black line when the beat would sound. I also wanted them to be more realistic in their movements, therefore I decided to have the rectangles bounce against the edge of the animation, and then pull back, which would then show anticipation.
The way I was able to mark out the places where my objects would banging together was by using the wavelengths, and listening to the music at the same time. Then by pressing on the star key on the keyboard, these small markers would appear on the timeline, and this was a great deal better then guessing, this also meant I didn't have to listen to the song over and over again, I would have all of my markers worked out, and this allowed me to get more done quickly.
I then had to created my balls that would come out from either side and use the black line as a wall and bounce off of it, creating the sounds. I began by first creating a new solid, and then using the circle mask tool I created a circle. I used balls for the sound because I felt that they would be the best and emulating the sound, as well as they could move at the correct speed.
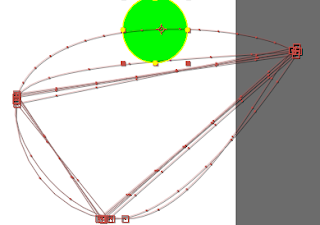
Here are the paths that the same ball would take. As you can see there are 2 paths that are rounded and the others are straight, which was not what I wanted. I therefore decided to copy the keyframes from the first loop, and then I pasted them in the places where I wanted my balls to bounce. (I also did this on the ball on the other side as well).
I then found again I would have to use squash and stretch to make my balls more realistic. so when my balls hit the wall and the floor they would squash and then within the places in between they would stretch.
I then got suggested by one of my tutors that I should maybe have the balls changing colour alternately. Therefore I duplicated the 2 ball layers to make 2 exact copies and then I would have one of the balls (from each side) one colour and the other another colour, this would then be seen as the balls changing colour each time they went off screen and then back on screen.
I also tried to put a motion blur on the balls, however, due to the speed at which they were travelling in, they looked better without the blur, mainly because the motion blur made them look too blurry.
I also used the Wiggler with this animation as well as the Bongos animation, I used it when the 2 blocks from the top and the 2 blocks from the bottom came together in the middle, this would make them look clunky, which was my goal, because the movements fitted with the song that I had chosen. I again had to experiment first, because then I could get the movement perfect to the section of the song that I had chosen.
Here is a screen shot of my video after being rendered to a Quick Time movie.