Wednesday, 13 January 2010

Production Log for my Building Poster

For my second idea I wanted to try and create a digital version of one of Katz's designs of a building, I chose this design because I thought that the colours were similar to my swatches that I had chosen, also I liked the way that Katz had made the image look 3 Dimensional, even though it was flat.

I begun with opening a document in Illustrator making sure that it was A3 and the colour mode was in CMYK (this was so I could print it out without there being any colour problems).
I then started with the background colour I had noticed in the original that the background colour was quite a darkish red, therefore I had chosen this colour.


I then added the building making sure that the colours were first complimentary to the background, so that I wouldn't clash, also make sure that the colours were almost the same as the original.

I used the rectangular tool to first create the main area and then the 2 chimneys on the top, to create the triangle on the side I used the star tool, and then pressed the downward arrow on the keyboard until the shape was a triangle (pressing the up or down arrows on the keyboard would increase or decrease the amount of points on the shape).
I then added the windows that were showing in the image, however I did not copy the original completely because I wanted to use it and make it my own, therefore I placed in more windows and placed them in different positions.

At first to make them stand out I made them white, and at first they had a black stroke around them at which I did not want therefore I got rid of the stroke.


I then put 2 television aerials on the top of the building and to make sure that they were not the same I draw them each separately using the line tool, and to create the dish on one of the aerials I used the circular tool.

By doing this, I was hoping that it would give my image a sense of realism like Katz's original.

I then added in the name of the artist and the years at which he worked. I thought to myself that I would like to make the name and dates stand out otherwise people would not know who I am supposed to be advertising, therefore I places a white box around the text, and this made it stand out.

Also putting a white box with the text in it, and then placing it in a corner I found it was of a similar style to the book at which was on Alex Katz.
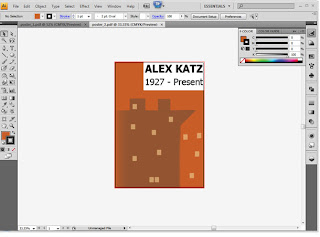
I then took another look at the original and then compared it to my design. I had then found that the colours were too bold and the image was too flat and on the original the building seemed to have faded into the background on one side and the windows did not stand out as much as mine.
I therefore changed the colours so that I would suit the original more and hopefully make mine look better, I then used the colour swatch that I had chosen previously and then I used another colour for the windows.
To make the building blend into the background on one side I used a technique called Gradient Mesh. I first pressed 'U' on the keyboards and then I selected the points at which I wanted to change, I then selected other points and using the Ink dropper tool (i on the keyboard) I was able to choose the background colour, this then showed the building fading into the background on one side, like the original.
I also noticed that on the original that the windows that were placed on the outside of the building Katz had put them at an angle or in perspective, like they were on another building that you couldn't see, through the fog that was portrayed.
Therefore to create this effect I selected the windows that I wanted to give perspective to and I then I went to Effect/3D/Extrude and Bevel.
I would first make sure that the preview was checked so I could see what I was doing. I then changed the extrude depth to 0 pt so that the windows would not become 3D, I then started changing the Perspective of them.
I experimented with the different setting until I got the effect that I wanted.

I then noticed, as I have said before, there was a foggy effect on the original therefore to achieve the same effect I just made a box and filled it with a light grey, I then made sure that it was only over the image and not the text, then to allow the image to come through I decreased the opacity of the grey section to about 30% and this allowed me to achieve the foggy effect.
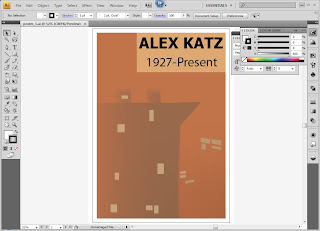
I then showed what I had done to a few people as well as my tutor and someone had suggested that I should make the background of the text box the same colour as the windows, because then it would fit in better with the poster, also someone else suggested about putting a white border around the whole thing, this was to make it look more professional.
And lastly, my tutor had mentioned that the typography for the date section, did not look professional therefore I changed it to another font, Helvetica, this looked better, and then using the Kerning section in the paragraph window I was able to make the space between the '-' and then 'P' a bit bigger so it would match the spacing between the '-' and the '7'.
After all of the different trial and errors I came across I finally came up with my final design, which is in the last screen grab.

Friday, 8 January 2010

Production Log for my Tree Poster

First I had come up with a few sketches in my sketch book, this was so I could get an idea of what I wanted to do for my final designs. I decided on 2 designs from my sketch book that I thought were of the same style and techniques that Alex Katz used.
I first decided to try and create my own version of the tree paintings that Alex Katz had done, I first started with the trunk of the tree, I situated it in the middle because I felt that I would give the audience something to focus on, therefore I was making it the focus point.

I then created the branches, that came out of the trunk of the tree, here I used the line tool.
Then using an art brush I would create the leaves that in the original Katz had used his art brush to give a certain effect I therefore tried imitating this using an art brush in Illustrator. I first picked out the main colour, which her was a golden brown colour, this was to show the autumn leaves.


I then chose the next colour that I would use which was a darker brown this would show the leaves that were in the later stages of autumn, I also included some brown bits on the trunk this was to give a sens that the tree must have been quite old, maybe with some rot on it.

I then decreased the opacity of the leaves this is so I made the image look more like a painting.

I also used the font Tohoma, This was after my research I had concluded Tohoma was best for this particular artist and his time. Therefore to make the name stand out more I had made the name bigger then the other text and I had made it bold.
This design, with the text at the bottom and the top with the image filling the middle, I have found quite an interesting design at which is why I had chosen it to use for one of my poster designs.

Thursday, 7 January 2010

Prodcution Log of my Leaflet

In this post I will be explaining how I have created my leaflet, and why I have chosen the ideas and the decisions that I had made. I had to decide what kind of leaflet I will want to create a template for, I had a choice of a tri-fold leaflet or a gateway leaflet. Due to what kind of effect I wanted to achieve I therefore decided to go for the gateway leaflet.

First I had to create a template to which I will have to work in, and this will help me to create my Gateway Leaflet.
I opened a new document in InDesign, making sure that first the Master Text Frame box was ticked, as previously advised, I then went about changing some of the default setting to the settings that I wanted. For example I wanted the page to be A4 and in the Landscape position, and once I had made all of the necessary changes I then had a basis at which to start building my template.
Then I used the rulers, which were to the left and on the top of the work area, to measure the right dimensions for where I will need to place my text box. And then using my Text tool I had placed the boxes in the same positions. And to make sure I knew what to put where I then labelled each of the sections.
For the front of my leaflet I wanted to place this image on the 2 sides so that when you put them together it would make the complete image and that will be in the center of my leaflet.
In this screengrab below, I am designing the front and back of my leaflet, I first tried to separate the Alex Katz image using Illustrator however, I was unsuccessful, I therefore decided to copy the image and place the 2 images at opposite sides, making sure that they are perfectly aligned. I then decided on the back I was going to put a small bit on information about the artist as well as a photograph of himself. I then tried printing the page out and folding it to make sure that the template and the design worked, and they did (I put the print outs into my sketch book to show my progress).


As I then knew that my leaflet design would work I then decided on colours for the inside and the front and back of my design. I wanted to carry on with a similar style to which Katz worked, therefore I went onto Kuler and found 3 different swatches of colours that I felt best went with Katz's style, I then chose a main colour swatch and this allowed me to have the 2 colour that I have used for my leaflet.
Here I am showing how I placed my colours, I first filled each of the 3 sections in with the same brown, I then decreased the opacity to about 50%, this is so it does not over power the writing and images. I then found because I had decreased everything in the boxes I had also decreased the opacity of the text as well, therefore I just copied the right sections and then paste in place, which then gave me a 3 toned effect when I printed it out for a test. I then moved the edged so that the white and the lighter brown was of similar widths, this was so that I looked better and more orderly.
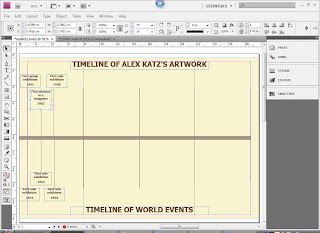
Once I had finished with the front and back, making sure that the finer parts were sorted, I then concentrated on the inside making sure that I had enough information to allow myself to create a quite filled timeline of Alex Kat'z work and life.
I got this information from his website http://www.alexkatz.com/ and on this website it a mini biography and a full biography, and this allowed me to get the information that I needed.


I then first went through all of the different exhibitions and parts of his life that I felt was quite substantial, I had to make sure that the choices that I made were relevant to the artist, also because Katz's had been having exhibitions since the 1950's to the present day there was a lot of information that I could have used, But I made sure also that I had chosen parts of his life and work from every decade. This was to show that he has been around constantly.
I then decided to show what was going on at the same time in the rest of the world, this was to see if there were at any point a time or place that influenced Katz at all, and if not then it would just show what Katz had to work through.
The information that I used I had got from one particular website, at which I had found through Google search, after putting in world events and then a year, www.historycentral.com/Europe/Index.htlm, there were a few coincidences that I have found for example in 1989 Katz had an exhibition in West Germany and in the same year was when the Berlin Wall came down.

After looking through the 2 different timelines, I feel that the world events really didn't have any affect on Katz's work because as I look through there were no really changes to his style, therefore it shows that he is consistant in his work even through difficult times.

Swatches for my designs

I went onto Kuler and after looking through and comparing different swatches to Alex Katz's work I have found 3 strong swatches that I feel co insides with his style of work.
I first notices that Alex Katz mainly using natural colours, this seems to be because he is mainly using real people as models to create his artwork, however there are some that are quite bold, and this is where Ktaz want to make an affect on the people who see them.

The first swatch is called Copy of Natural Path, I like this swatch mainly because there are natural colours that match some of Katz's work, and therefore it would be easier for me to use them to link with Alex Katz.


The next swatch is called Katz, this is because I was trying to see if Alex Katz had any swatches, and the way I came up with this one was by typing Katz into the search engine.
I feel again that this one can be used to represent Katz's work, this is because it uses natural colours and quite bold colours at the same time. However, I feel that compared with the first one I don't think that it is as closely matched to Katz's artwork.


And lastly the swatch is called Alex Ross Warms, again to get this swatch I used a similar technique as before, however this time I typed in Alex, I think that this one is not as good as the 2 before however I do like the colours within, but I won't be choosing this one as it doesn't really represent Alex Katz fully.
After looking at these three swatches carefully against Katz's work I have found that the first one, Copy of Natural Path, was the best and the one that I am going to use for my project, using one swatch will hopefully link all of my components together as well as showing consistency throughout my work.

Monday, 4 January 2010

Production Log for Postcards

I first started designing my postcards in my sketch book, using mini drawings and quickly sketching out different things I was able to come up with many different ideas for what I wanted to do for my postcards. Once I had decided on the ideas I then created them in Illustrator, and here is how I did them.

First I looked back to the example of postcards that I had collected, and then to get the size of
my postcards the same, I decided to measure the existing postcards and that is how I got the size for my postcards.
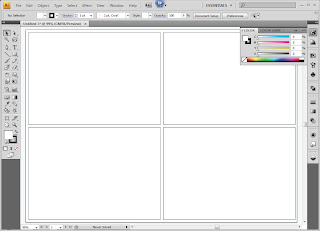
And as you can see here I have made one and then I had copied it 3 times to make the bases of my 4 postcards.

To start my first postcard I had to choose the correct colour that matched my designs, (and before all of that I had to make
sure that the colour mode was CMYK, as I will be printing these out).
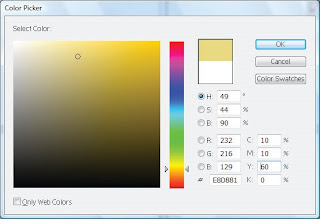
In this screen grab I show the percentages at which I have made my colours, using the CMYK, but to get to that stage I had to experiment with different percentages to see if I could get a colour that was either the same or similar to the design at which I had done in my sketch book.

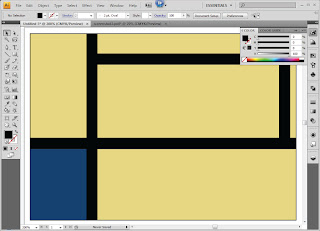
Here I have chosen the background colour, and using my designs from my sketch book I was able to place the black stripes in the correct places, and then I chose the right colour for the blue section, I thought to myself for the blue I had to chose a shade of blue that wasn't to bright
however it needed to stand out, which is how I came to choose this shade. I then did the same for the red colour that I had at the top of the postcard.
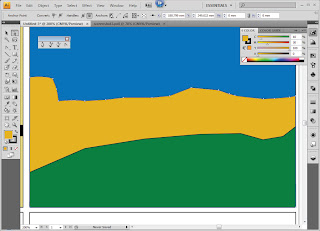
The second one I had to start with the blue as the background, and with this design I wanted to make it quite bold, but not to bright. I then used the pen tool to make my yellow section and the way I made the edges curve was by using another tool, which was part of the pen tool section, this is the curve tool, I then repeated the action with the green section.
The way I determined the colours was to first look back at my design to see what sort of colours I used, and then using my sketch book as a reference I was able to pick out my colours through experimenting and eliminating the shades or colours that I did not want to use or I did not think was right for this one postcard design.
Here I took a screen grab of the third postcard that I had designed. The design came from one of Alex Katz's collages that he had created.
How I did this one, was by first deciding on the background colour of my postcard, and then adding all of the different shapes that I had designed in my sketch book. I also made sure that each of my shapes had no fill and a black stroke/outline, this was so I could place them in the correct places and then fill them in once they were are placed and in the right order, and because I had used only a minimal amount of colours I was able to change them in groups by clicking on one and then holding down the shift key to select more at the same time.
Using my finished sketches in my sketch book, I then used the white arrow tool to manipulate so of the objects, this is so that it was look like my designs. The way I manipulated them by using the white arrow tool, was to select the points at which I wanted to change and the either dragging them to a certain place or even deleting them if they were not needed.
As you can see here I have filled in all of my objects and I have taken away the stroke. Moreover I have looked again at my sketches and I found that I used a darker tone on the bottom then the top, hence the change fat the bottom.
Here is the last postcard design, and with this one I wanted to use my knowledge of colours to help me determine what colours I used.This one was a bit different to my sketch book design because with my sketches I had basically copied Katz's work, and what I wanted to achieve was an understanding of his work and therefore I had changed my design from flowers to leaves, however keeping with the same ideas.
Using my knowledge of colours I thought to myself as leaves are green I will use the opposite colour on the colour wheel to make them stand out, which therefore allowed me to make a decision on the background colour being red.
In this screengrab I had already drawn a leaf, then I had copied it many times, and then manipulating them to make them each look different.
To create the effect of the leaves going off the page I had first placed some of the leaves over the edge I then, using the line tool, placed a line on the edge of the postcard, I then went to Object/Path/Devide Objects Below, this then allowed me to delete the excess parts of the leaves that I did not want, and this allowed me to achieve the effect that I wanted.
In this last screengrab I have shown each of my postcards, and these are all different takes of Alex Katz's work, I wanted to show that I understood the way at which he worked, and the way he used colour to create his designs.

Friday, 11 December 2009

My changed Decision

After looking through Lichtenstein's work I did feel like I wanted to carry on with it, however I originally wanted to do someone that hadn't been either done before or done that often and once I had spoken to my tutors I had found that unfortunately Roy Lichtenstein is very popular, and therefore I decided to chose someone else.

I had trouble finding someone that I liked, and then I thought about asking one of my tutors, and I also remembered that in my research I had looked at another pop artist called Alex Katz that I did, and when I looked closely at his work I found that I really liked his worked. Mostly because his work is simple but effective, and I have been able to think of more ideas that I will be able to use by using Alex as the base of my work.
When looking through I found his website that has a complete Biography of his, also there are links to gallery websites where his work has been exhibited.
http://www.alexkatz.com/index.html This website is the officially website for Alex Katz.

Tuesday, 8 December 2009

My decision

For my project I had first decided to do a Time Capsule on a full art movement, which was Pop Art, but after going more in depth of the movement I found that I particularly liked just one artist from the movement, this person was Roy Lichtenstien. I feel that Lichtenstein has many different pieces that interest me. For example:


Each of these pieces are lively and there is many different things going on at the same time. Lastly I feel that the outburst and inventive nature of Lichtenstein's work is what I would like to look into, also I really like the different bold colours that he used.
Using Roy Lichtenstein as the base of my project I feel is a good decision because he has got many pieces of work that I could use for my postcards, posters as well as the outside of the box itself.
For example I could use the dots that he uses insome of his work and create a pattern on the outside of the box in the style of his work.