 First I have to decide on the text that I want to use, and that would be best for the design. I would then type out the words that I would like to use, and I would have to make sure they were correct as I would not be able to change them later on.
Next I would have to change the text from standard type to outlines that can be manipula ted and changed to how I want, this application is called Create outlines.
 ted and changed to how I want, this application is called Create outlines.
Here I am showing what that particular tool does, as you can see around the text 'Smiling Steve' there are small blue lines, this indicates that the words are no longer text that can be changed but they are now images that can be manipulated easily.
Now to create the lines that will be part of the overall effect, I first have to make a rectangle above the text, and 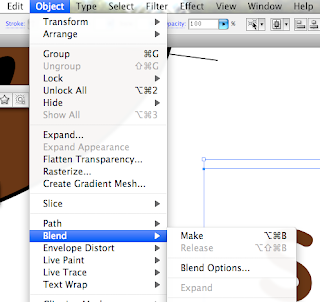 then whilst holding down ALT, I then click and drag the rectangle until it is below the text (holding down ALT creates a duplicate of the original object). Then whilst both objects are selected I make sure that they are aligned, by using the alignment tools. Again, whilst they are both selected I then go to Object/Blend/Make, as I am demonstrating in this screen grab.
 then whilst holding down ALT, I then click and drag the rectangle until it is below the text (holding down ALT creates a duplicate of the original object). Then whilst both objects are selected I make sure that they are aligned, by using the alignment tools. Again, whilst they are both selected I then go to Object/Blend/Make, as I am demonstrating in this screen grab.
This tool will then allow me to see this, and what this tool does is between the 2 objects that were originally selected it has made copies of the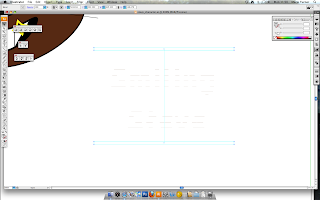 rectangles until the area between the originals is filled. And therefore I am unable to see the text that is below it, because there are so many copies.
 rectangles until the area between the originals is filled. And therefore I am unable to see the text that is below it, because there are so many copies.
The way to reduce the amount of rectangles is to find the blend tool on the tools bar, double click on it, and then you will get a small option panel, as shown here at the bottom, and where it states 'Spacing:' make sure that it is on 'Specific Steps' this way you are able to change the amount of rectangel to however many you would like in your design.
 where it states 'Spacing:' make sure that it is on 'Specific Steps' this way you are able to change the amount of rectangel to however many you would like in your design.
And her I have chosen 15 steps because after looking at other amount I found that 15 steps was best for my design.
To allow myself to manipulate the rectangles indiviually I have to 'Expand' them and the way I do this is to go to Object/Blend/Expand, this then makes each one seperate, and then I have to Ungroup them and the way I c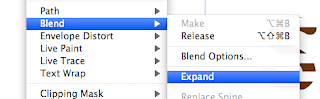 an do this is by using the keyboard shortcut Control/Shift/G for a PC or Apple/Shift/G for a Mac.
 an do this is by using the keyboard shortcut Control/Shift/G for a PC or Apple/Shift/G for a Mac.
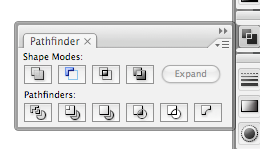 Once I have Ungrouped everything, I then go to Windows/Pathfinder, and then I will get this window pop up, and the tool that I would need to break up everything is the bottom left tool, which is 'Divide', but before I do that I make sure that everything that I want to manipulate is selected, I can do this by a keyboard shortcut, which is Control/A for a PC or Apple/A for a Mac.
 Here once I have divided everything I then delete all of the parts that I do not need, and that would leave me with just the text that is covered in lines. I then copy all of the text and to paste the copied text behind the original text I can use another keyboard shortcut which is Control/B for a PC or Apple/B for a Mac. Then I use the Pathfinder tool again, however this time I will be combinding them, this tool is located top left of the panel, and then I chande the fill colour to something that I appropriate.
After that, with the text still copied, I then have to paste one in front, this will allow me to make an outline. To do this I can use the keyboard shortcut Control/F or Apple/F. And again I use the combined tool on the Pathfinder panel to combined everything together and then I make sure that the fill colour has nothing in it and then I choose another colour, that is appropriate, in this case red and I put that in the stroke section.
Here I am showing that using this panel I am able to change the width of the stroke to however wide I feel that will make the text show up even more.

And here I am showing the final image that I had create using this technique at which I had previously learnt in another class.

And here I am showing the final image that I had create using this technique at which I had previously learnt in another class.
For my project I think that this technique is appropriate because my target audience is children/parents buying for children, and therefore I feel that this a fun way to show the name of the character or products and will hopefully attract the children to buy it.

No comments:
Post a Comment