I found that because of the lines fron the path and the railings this one was the hardest to put together.
 First I would lay out all of the images that I intend to use in a new document, like my first panorama, and then overlap them by decreasing and increasing the opacity of each image.
 I would again have to crop out the excess space at which I would not need and then reduce the size of the image to at least 12000 pixels.
Then I would have to use Free Transform to allow the images, especially the lines in the pavement and the bandstand railings. The only way at which I could use the Free Transform in an effective way is by holing down the Control button (on both an Apple Mac and PC) and then manipulating each corner at one time.
I repeated this process for each of the images so that they would all line up, and that would make it easier for me to blend each of them in.
However I found that because I had taken some of my photos towards the sun, the colours were not all of the same and therefore I had to use another non destructive way of changing each single images so that all matched.

To get the images to that the brightness or darkness matched I had to use the Levels palette, like I have mentioned before. I first click on the layer at which I want the levels to effect and then click on the levels option, and then I was able to move the small arrows to make the image darker and lighter.
However, so that it doesn't effect the rest of the picture I have to click on the levels at which I had jus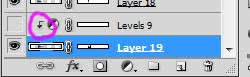 t put in and then hold down Alt (on both an Apple Mac and a PC) and click between the levels and the layer and which you want it to effect, and you will end up with this symbol that is circled to the left of the image.
 t put in and then hold down Alt (on both an Apple Mac and a PC) and click between the levels and the layer and which you want it to effect, and you will end up with this symbol that is circled to the left of the image.
Once I had gone through each image and repeating the same process for each image until it was a seemless picture I would flatten it and then again save it for the web. Saving for the web allows me to decide on what the quality I want the image to be and whether I would like it as a JPEG, GIF or anything else, however in this case I have saved the flattened image as a JPEG.

Lastly, once I have gone through the same process like the first panorama, by opening the .jpg image in stitcher I was able to achieve a .mov of the Band Stand that is situated in Burgess Hill town center.
And here I am showing the finished product as a still image.
With this panorama I had to make 2/3 changes in the process because as I put it into stitcher I had found that there were faults that needed changing, until I had got my desired result.
No comments:
Post a Comment