Friday, 22 January 2010

Research on Colour - Colour is Light

It is said that there is no colour only light. This can be proved by a Prism, if you shine a light through a prism multiple colours will be reflected out of one of the other sides.

Here is an example of what happens when a white light hits a prism.

Light consists of electromagnetic waves, and to create the white light that then splits into the other coloured lights there is a mixture of equal amount of wavelengths and frequencys.

Here I am showing the different wavelengths and frequencys that each of the different colours have once they have been reflected through a prism.
As you can see here the red colour at the top has longer wavelengths with a lower frequency and at the bottom the violet has shorter wavelengths with a higher frequency, this range of wavelengths and frequencys allows each of the colours to become visable by themselves.

The way we see colours everyday is where a particular colours is being absorbed and then reflected back to our eyes. For example a leaf absorbs the all of the coloured lights and then the green light is reflected back to make the leaf look green.

Tuesday, 19 January 2010

Research on Colour - Colour Wheel

Due to the fact that I had chosen Colour as the subject of my website. I first chose Colour because I find that throughout a career that I would hope to have, colour will be one of the most important aspects of my work, and therefore the more I can extend my knowledge on the subject I will hopefully end up becoming a better designer.

The first part of colour that is normally taught at the beginning is the Colour Wheel:
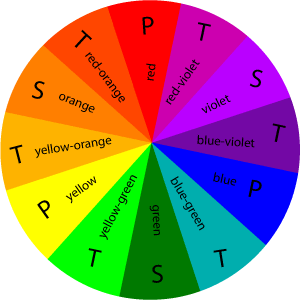
As shown here, the colour wheel has normally got 12 colours within it, and with these 12 colours can be used to make up the Primary Colours, the Secondary Colours and the Tertiary Colours.

The Primary Colours are the 3 pigment colours that cannot be formed by any combination of other colours:
Red
Blue
Yellow.

The Secondary Colours are the colours that are created when the primary colours have been mixed together:
Green
Orange
Violet.

The Tertiary Colours are the colours that are created when the primary and secondary colours are mixed together:
Red-orange
Red-violet
Blue-violet
Blue-green
Yellow-green
Yellow-orange.

As I have stated there are only 3 of the Primay colours and 3 Secondary colours however there are 6 Tertiary colours, due to as I have stated the tertiary colours are created via mixing the secondary and primary colours together, therefore creating a greater number of combinations.

Using the Colour Wheel we are also able to create colour swatches using different combinations of colours.

Complimentary: This means using 2 colours that are at opposites sides of the colour wheel, for example, Yellow and Violet.

Split Complimentary: This means using 3 colours, in a similar fashion to Complimentary, however there would be one colour on one side and then 2 colours from the compliment, for example Green, Red-orange and Red-violet.

Analogous: This means that 3 colours that sit next to each other on the colour wheel are using harmoniously, for example, Yellow-green, Green and Blue-green.

Monochromatic: This means that you would use one colour, however you would then using different shades of that one colour.

Achromatic: This means that there are no colours only using neutral shades/tones, for example Black and White.

Assignment 4 - Design for the Web - Brief

For this assignment I will research, design and build a website on an aspect of digital media design theory useful in the degree course. The target audience for this website is the other design students, so I should introduce the topics assuming no previous knowledge of the subject but I can take it beyond the basics. This is not a software skills website, it's about design principals.

During our first class with this brief we each decided which subject we would like to choose, the options were:
Typography
Colour
Composition
Drawing
Animation
Video Editing.

Due to my existing knowledge, also I would like to go into more depth with this choice, I decided to choose Colour as my subject.

Friday, 15 January 2010

After the 'Crit' Session

During my 'Crit' session I had found that because I had finalised my work and made it look better in the end, I had quite good feedback, I had been told that my work seemed to reflect my chosen artist and everything seems to be linked by colour and image.
Therefore I am very happy with the products that I have produced, and I feel that I have used the time that I had to my advantage, and the previous feedback that I had, I then put to practice and in the end made my products better.

Wednesday, 13 January 2010

Production Log for my Booklet

My booklet would actually contain my essay, and maybe a few image of the artist and his artwork.
I first made my character styles at which I was going to use in my essay, I also changed my paragraph styles. The character style determines what single selected letters would look like, and the paragraph styles would determine what the rest of the text would look like, and the rest of the text is called the body text.
Both of these icons look the same as do the windows when you open them. Each of these are found under Windows/Type & Tables. you can also find other icons there as well, in case you needed them.

I first thought that I wanted to link my work together so that I is almost all the same style, therefore I used the same technique as I did for the background of my leaflet, and the colours of my leaflet.
Therefore as you can see I have got the 3 shaded effect, and the colours of the type are the same as the front of the leaflet.
Also to keep the continuity of my work I also used the same image on the front of my booklet as I did for my leaflet.
I also wanted to to make the border of the lighter brown the same all of the way round therefore I changed the position of the darker brown sections to where I needed them to be.
On the inside where my text is going to be I have made it the same colour as the inside of my leaflet, also I have decreased the opacity to 50% so that is was only the background colour, and did not over power the text.
I first had to write the text into a word document, and then later add it to the InDesign document.
To add it I would first make sure that I had continued the text areas so the text would flow into the correct places, to do this I just clicked on the bottom square, on the edge of the text box and then click in the text box at which I wanted the text to flow. I would then go to File/Place and I would select the point of where my text would start. And then due to my previous actions the text should flow into the correct text boxes, and therefore when I would do a test print everything should read fluently.
I also changed the colour of the text to the same colour as the background of the outside of my booklet.
I also added my Character styles that I had previously created. The first one was to make very first letter bigger and thick then the body text.

Here another 2 pages of my booklet, I have also added another character style to the first letter of the brand new paragraphs, this was to make sure that each one would show that it is a different subject. I therefore did not make the style thicker I just made it taller then the body text.
And when it came to the paragraph style I just made sure that the size of the text was to how I wanted, which was 14 pt, and the colour was the same as the front background colour, also to carry on with the continuity of my work I kept the same font, Tohoma.

Due to some of the content in my essay I wanted to place an image that was relevant therefore I remembered mentioning about the Time Square Mural, at which I had found in the book on Alex Katz, and I thought that I wanted this image in the center of my booklet.
I first tried finding it on the Internet, and had no luck therefore I scanned the image into Photoshop and the cropped out the parts that I did not want, I then placed it into my area at which I had already marked out.
And then to allow me to carry on with the colour scheme I had thought that I would use the same colour background for my image as I have on the front of my booklet, I also made sure that the white borders at the top and bottom were continuous thought my booklet, therefore I had to see if they are in the correct position before I tried printing it out.
I then printed out a tester to see if my design would work, and thankfully it does, and this tester I will stick into my sketch book.

Production Log for my Face Poster

After a slight 'crit' session I then decided to create a third poster that would replace the Tree Poster. I first chose a design at which Katz had previous painted for the poster that I was going to digitally create.
Using the paint brush tool I first draw out the image, this would then allow me to fill in the spaces once point at a time, however in the final part I would not have any outlines or strokes.
I also adapted my other design for the poster itself, instead this time I will have a white border all of the way around the image in the middle, with the text above and below the image as like my Tree poster.


Here I am creating the left eye, which is no completely visable, I first used an art brush to create the paint brush stroke effect.
Then I drew in the eye lid in the same place as to where the original image is, I then tried to match the colour of the eye itself, also the white dot in the middle of the eye is not an error I had put it there because I was copying the original, and hopefully using the small details would make my poster stand out.
I then filled in the colour of his hair first with a base colour, as I assume the artist would have done. I then added strokes of different colours to give the hair some natural highlights that were shown in the original, some of the strokes I had changed the opacity to make them look more effective.
I also did a similar technique with the eye brows, this is because this would hopefully give my image some depth, by adding the shading that is in the original.

I then gave my face the base colour for the skin, and after showing it to my peers someone had mentioned that on the original there is some sort of shading all over the face.
I therefore chose to use the same effect as I did for the Building Poster and that technique is Gradient Mesh.
Now I had figured out how to use it, I thought it best to use it for this problem.
Therefore I had to experiment with different shades until I had found the right one for me, after that I then added the gradient mesh by pressing the 'u' key of the keyboard, selecting the points that I wanted to change the colour of and then selecting other points that I wanted to be the skin colour, and this gave me a shadowed effect.
I then used the gradient mesh on the other parts of the face as well, for example the eye, where on the original there was some shading around one of the eyes as shown here.
However due to the nature of the shadow, and due to the shape I had to experiment again with the colours until I achieved the right effect.
I also had to change the size and positioning of some of the point in the gradient mesh and to do that I had to first select the white arrow tool and then select the points I wanted to move, and then move them to the correct positions.
And for my shadow to work I had to make the mesh fairly big, and make sure it was under the eye itself.

Here I am showing the whole poster, that is because I had finished with all of the different sections of shadowing, and this is a way to see what I looked like all together.
I then showed my poster to my peers and tutors, and someone had mentioned that my border line looked like it shouldn't be there, so I had to make it thicker and more defined, also as the same as the Building Poster the date typography did not look professional, therefore to keep the designs the same and continuous I chose the same font as before, Helvetica.
And here is my final product, also it make the image itself stand out I also changed the white spacing in the image just off white, this was so it didn't blend in with the border.
I also changed the Kerning of the date text as well, just like the Building Poster, I did that because this would then make the poster look more professional, even though it is only a tiny detail if this is what I want to do, then I should be looking out for it.

Changes I have Made

When I took my work into college to show my peers and my tutors I then found that I had got many criticisms about my Tree Poster, that is because I first found that instead of looking like painted leaves someone had said that they looked like peanuts, and this wasn't the affect that I wanted to achieve.
Also someone had asked me why didn't I do a poster with a person on it, as that is what Katz is mostly famous for. I then decided that I was going to scrap the Tree Poster and start work on another poster that had a person or figure in it, and that will hopefully give me a better outcome then what the reactions were to my Tree Poster.