I feel that I have been able to meet the brief and get everything done on time, however I did find this assignment difficult due to the fact that I did not have a Mac at home, and therefore had to make sure that I had finished my film before the half term.
I feel that if we did not have half term then I would not have had to rush, even though I still feel that I like my video and I am proud of what I have achieved.
Showing posts with label YEAR ONE. Show all posts
Showing posts with label YEAR ONE. Show all posts
Tuesday, 8 June 2010

My finished Animatic
Here is my finished animatic, this allowed me to edit my film to the correct length, and also allowed me to edit each clip to a specific time.
My finished Video
Here is my finished video I feel that using the theme that I have chosen I have been able to match the brief, especially because I did not have to use other sounds, and all of them are original.
Production Log 2
Here I have got my production Log for DVD studio pro.
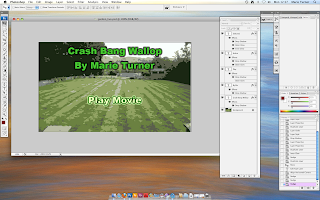 To create the DVD title page I had to make it in Photoshop, this was so I can add different effects to the hover state and the selected state of each of the buttons.
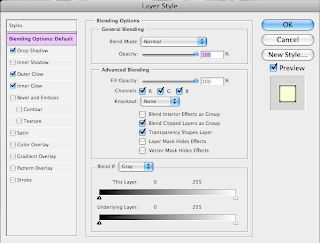 This is the box that comes up in Photoshop, which I used to create the hover states and the selected states, this gave me the opportunity to make each of the different state different to the last one. After I have finished I then save it as a standard .psd file called ****_live.psd, this is the full layered including the effects, and then resave it out as ****_flat.psd, this means that I had to flatten the layers so that the effects do not show.
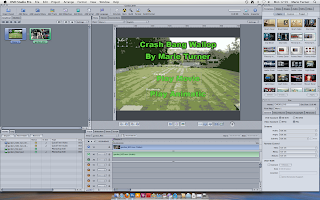 This is the screen at which I see when I open up DVD Studio Pro, this allows me to authorise the DVD and give it a title menu for the beginning. I first have to delete the menu part in the top left box, and then add a layered menu, this allows me to add in the PSD file (the flattened version) and then I place a button box over the top of the buttons this will make them active when it is placed into a DVD player.
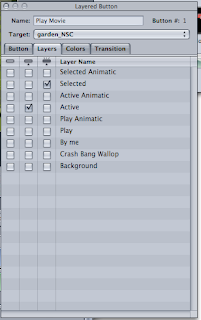 Once I have imported the film, animatic and the psd file I then have to create a new track box next to where the layered menu box is. Here is where I can select the layers that I want to show when the mouse hovers over the writing and when the writing has been selected. To place each of the files into the correct places all I have to do is select them and drag them into the correct boxes.
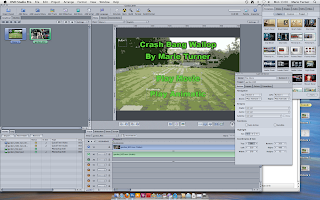 Here is what my first page looks like, and when the viewer clicks on either the Play Movie or Play Animatic they would be taken to the specific page at which I have told the programme to link them too.
 To create the DVD title page I had to make it in Photoshop, this was so I can add different effects to the hover state and the selected state of each of the buttons.
 This is the box that comes up in Photoshop, which I used to create the hover states and the selected states, this gave me the opportunity to make each of the different state different to the last one. After I have finished I then save it as a standard .psd file called ****_live.psd, this is the full layered including the effects, and then resave it out as ****_flat.psd, this means that I had to flatten the layers so that the effects do not show.
 This is the screen at which I see when I open up DVD Studio Pro, this allows me to authorise the DVD and give it a title menu for the beginning. I first have to delete the menu part in the top left box, and then add a layered menu, this allows me to add in the PSD file (the flattened version) and then I place a button box over the top of the buttons this will make them active when it is placed into a DVD player.
 Once I have imported the film, animatic and the psd file I then have to create a new track box next to where the layered menu box is. Here is where I can select the layers that I want to show when the mouse hovers over the writing and when the writing has been selected. To place each of the files into the correct places all I have to do is select them and drag them into the correct boxes.
 Here is what my first page looks like, and when the viewer clicks on either the Play Movie or Play Animatic they would be taken to the specific page at which I have told the programme to link them too.
Production Log
Here I have my production log, which show you how I made my video, what kind of editing I did, how I made the video background for the DVD studio section.
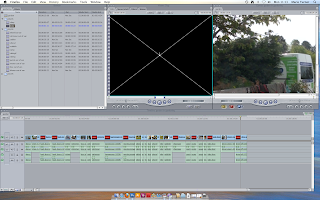 Here I have got a screen grab of what Final Cut Pro looks like as I open it, I first have to import all of the video that I have taken making sure that the video are in the correct format, otherwise it wouldn't work and I would have to use Compressor to put in the correct format.
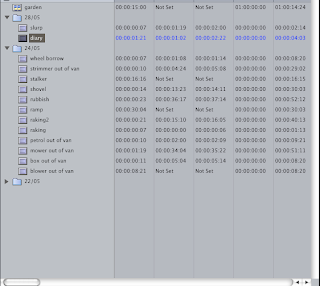 This is another screen grab of where the videos go when you import them, normally the naming would be most the same, and therefore to differentiate between them I would look through each of them and then label them according to what is on them, this would help me in the long run, so I can choose the right video to use.
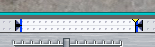 This is the in and out point where on the original videos you can select the points to which you want to then import to the new sequence and add them where they are appropriate. The Keyboard commands are 'i' and 'o'.
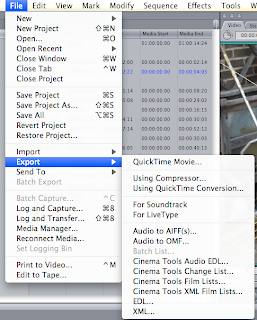 After finishing my full video adding in everything that I would need I then have to export it to a QuickTime Movie, this will then allow me to use it in DVD Studio Pro, as well as play it into Quick Time.
 Here I have got a screen grab of what Final Cut Pro looks like as I open it, I first have to import all of the video that I have taken making sure that the video are in the correct format, otherwise it wouldn't work and I would have to use Compressor to put in the correct format.
 This is another screen grab of where the videos go when you import them, normally the naming would be most the same, and therefore to differentiate between them I would look through each of them and then label them according to what is on them, this would help me in the long run, so I can choose the right video to use.
 This is the in and out point where on the original videos you can select the points to which you want to then import to the new sequence and add them where they are appropriate. The Keyboard commands are 'i' and 'o'.
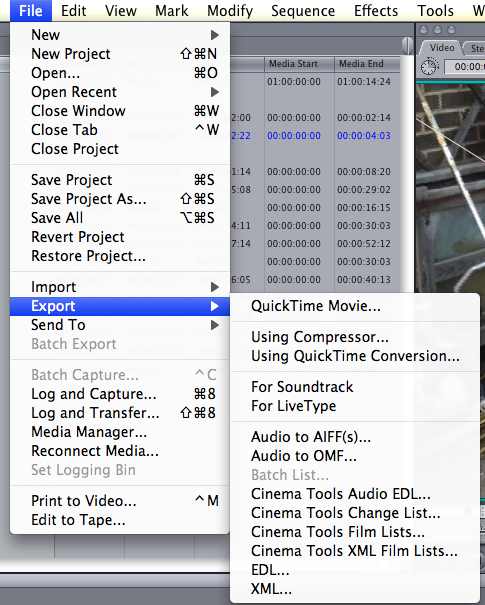 After finishing my full video adding in everything that I would need I then have to export it to a QuickTime Movie, this will then allow me to use it in DVD Studio Pro, as well as play it into Quick Time.
Saturday, 5 June 2010
Things that I will film
Here are a list of things that I could film and then put into my video:
Ø Getting tools out of van
o Lawn mower
o Strimmer
o Blower
o Rake
o Loppers
o Spade
o Shovel
o Concrete Breaker
o Have each of them laid out on the ground by the end.
Ø Lawn Mowing
o Starting mower and using it.
o Starting Strimmer
o Starting Blower
Ø Hedge Cutting
o Getting hedge cutter going
o Cutting hedges
o Clearing up
Ø Turfing
o Rolling out turf
o Watering
Ø Fencing
o Banging in posts
o Mixing concrete
Ø Sleepers
o Drilling screws in
o Banging in posts
o Putting in soil
Ø Planting
o Watering
o Making hole in ground
o Filling hole with soil
Tuesday, 25 May 2010
Problems
I have already encountered problems after I had filmed what I had needed to film, I went to put the videos into Compressor when I was at college, and I had found that it did not work.
I then tried playing them within Quick Time and again it did not work. I couldn't figure out why it wasn't working, and I therefore asked one of the tutors to help me, they said that the format that the videos were saved in wasn't correct and we could not figure a way in which to save them as a different format.
The reasoning for the different format was because I had shot my film with a Sony camera, and apparently they save their videos as a .MTS file, which cannot be opened. Due to this I thought that I would have to refilm everything that I had done, which wasn't good because I was following my boyfriend when he was doing jobs, and the footage that I had captured I could not recapture as he had finished those jobs.
I then took the camera home, and my Dad was able to change the format of the videos by using a programme called PMB (Picture Motion Browser). Using this programme I was able to import them and then save them out as a .MPG which I can use within Compressor and Final Cut Pro.
Therefore, I did not have to reshoot anything and I was able to use the footage at which I had previously shot.
I then tried playing them within Quick Time and again it did not work. I couldn't figure out why it wasn't working, and I therefore asked one of the tutors to help me, they said that the format that the videos were saved in wasn't correct and we could not figure a way in which to save them as a different format.
The reasoning for the different format was because I had shot my film with a Sony camera, and apparently they save their videos as a .MTS file, which cannot be opened. Due to this I thought that I would have to refilm everything that I had done, which wasn't good because I was following my boyfriend when he was doing jobs, and the footage that I had captured I could not recapture as he had finished those jobs.
I then took the camera home, and my Dad was able to change the format of the videos by using a programme called PMB (Picture Motion Browser). Using this programme I was able to import them and then save them out as a .MPG which I can use within Compressor and Final Cut Pro.
Therefore, I did not have to reshoot anything and I was able to use the footage at which I had previously shot.
The Programmes
There are 3 main programmes that I will use for this project to allow me to make my video, they are Final Cut Pro, Compressor and Soundtrack Pro.


I have found that i can use Final cut pro, for my editing and I quickly got the hang of using it, which made it easier for me.
When I used Compressor I found that it squashed my video and made it look worse then the original, therefore I decided not to use Compressor for that reason, and due to that my video turned out perfect.
I also found that I did not need to use Soundtrack Pro, mainly because the footage that I had used already had many different noises within them, and therefore I did not have to place any in.
Ideas for my Main idea.
To see and to give me ideas for what I could do to make my video better and more exciting I decided to have a look at other peoples' work to see how they did it.
This is called Gradyn. http://www.youtube.com/watch?v=cBN-CAhOYQ0 Here is a video that I had been shown, that demostrate what I could do with gardening to make it more exciting.
This video uses many different noises that can be made around the garden to create music with a beat.
To start with the creator first shows each of the different sounds as he/she needs them, however they cut away from the previous sound when a new one is introduced, nevertheless, the sound keeps going even though the video of the sound has stopped. The sounds each are added to create the beat for the music until all of the sounds are added and then the creator adds in a person talking, but uses their voice to make the vocals for the song.
After looking mainly on You Tube for different videos about gardening and to see how other people can do it, I found that there were not hardly any videos in the style at which I will be making my video. Most of the videos are of people explaining how to do things in the garden.
This is called Gradyn. http://www.youtube.com/watch?v=cBN-CAhOYQ0 Here is a video that I had been shown, that demostrate what I could do with gardening to make it more exciting.
This video uses many different noises that can be made around the garden to create music with a beat.
To start with the creator first shows each of the different sounds as he/she needs them, however they cut away from the previous sound when a new one is introduced, nevertheless, the sound keeps going even though the video of the sound has stopped. The sounds each are added to create the beat for the music until all of the sounds are added and then the creator adds in a person talking, but uses their voice to make the vocals for the song.
After looking mainly on You Tube for different videos about gardening and to see how other people can do it, I found that there were not hardly any videos in the style at which I will be making my video. Most of the videos are of people explaining how to do things in the garden.
Ideas for filming
For this project I wanted to make something that was original, and that could be initially part of everyday life, and make it seem quite exciting.
I therefore came up with a few ideas.
The first was to film in a shopping centre or is a supermarket, maybe when the place is quite busy, and I will follow a woman or man doing their weekly shop, however, to put a twist on the typical shopping trip I will make everything seem fairly animalistic, where the strongest wins, as that is what I see shopping as.
I could have shots where the camera is underneath the trolly watching the person place items in there, and covering the cameras view.
As well as have shots of trollies banging together as there is a rush to the counter or to any specific items (especially is there is a sale on).
I would then have maybe 2 or 3 peope arguing and instead of having the typical shouting from the people I would have animal noises instead, that would be my twist.
Another Idea that I cam up with was, again shopping however, I would have a ninja or something similar just doing the weekly shop and then suddenly break out into a fight scene.
The last idea I came up with was to go around filming all the different aspects of gardening, and then making the end scene like a bomb sight when the gardener has to water the plants, and have gun shot noises and bombs going off.
Out of all of the ideas that I came up with I decided to choose the Gardening one. This is because of many different reasons. Mainly because I could follow My boyfriend around as he is a gardener and runs his own business, also when it came to thinking about what could be possible in the short amount of time that we had, I thought that filming in a shopping centre or supermarket could be more hassel, especially if there were children around, also I would have to get the permission of everyone in the shot, have them sign disclaimers allowing me to use the shots that they were in, I would also have to get the permission of the shop managers to make sure it was ok to film in their shops. And that is mainly why I decided to choose the Gardening idea.
I therefore came up with a few ideas.
The first was to film in a shopping centre or is a supermarket, maybe when the place is quite busy, and I will follow a woman or man doing their weekly shop, however, to put a twist on the typical shopping trip I will make everything seem fairly animalistic, where the strongest wins, as that is what I see shopping as.
I could have shots where the camera is underneath the trolly watching the person place items in there, and covering the cameras view.
As well as have shots of trollies banging together as there is a rush to the counter or to any specific items (especially is there is a sale on).
I would then have maybe 2 or 3 peope arguing and instead of having the typical shouting from the people I would have animal noises instead, that would be my twist.
Another Idea that I cam up with was, again shopping however, I would have a ninja or something similar just doing the weekly shop and then suddenly break out into a fight scene.
The last idea I came up with was to go around filming all the different aspects of gardening, and then making the end scene like a bomb sight when the gardener has to water the plants, and have gun shot noises and bombs going off.
Out of all of the ideas that I came up with I decided to choose the Gardening one. This is because of many different reasons. Mainly because I could follow My boyfriend around as he is a gardener and runs his own business, also when it came to thinking about what could be possible in the short amount of time that we had, I thought that filming in a shopping centre or supermarket could be more hassel, especially if there were children around, also I would have to get the permission of everyone in the shot, have them sign disclaimers allowing me to use the shots that they were in, I would also have to get the permission of the shop managers to make sure it was ok to film in their shops. And that is mainly why I decided to choose the Gardening idea.
Different transitions and shots
There are many different transitions that can be used for creating my film.
For example:
'The most common transition is the cut, in which one shot changes instantly to the next.
The next most common transition is the crossfade (AKA mix or dissolve), where one shot gradually fades into the next.
Advanced transitions include wipes and digital effects, where shots whiz about or do complex changes whilst leading into the next.'
(Video Transitions, http://www.mediacollege.com/video/editing/transition/)
Fade to black, this is where the scene fades to a black screen.
Fade from black, this is where the scene is shown from a black screen.
However, even though there are many different tranisitions I could use for my film, I do not think I could fit them in, mainly because as the film is only 15 seconds long, there will not be anough time to allow for me to have transitions and make them look professional. Therefore, I will be only using the cut transition, mainly because I have to make my idea seem exciting and maybe have a twist, and to achieve that effect I will have to use the cut transition.
There are also many different types of shot/angles I could use for my film to get the effect that I would like to achieve.
There are:
Long shot: This is where the whole subject can be seen in the shot.
Mid-shot: This is where the camera is closer then the Long shot, however still having the background.
Close-up: This is where the camera is mainly focussing in on the persons face or any other part of the body, with a lot of detail.
Extreme Long Shot: this can be used as an establishing shot.
Extreme Close-up: This is where the shot is very close to the subject showing more detail then close-up.
Over the Shoulder shot: This is where the camera is placed behind someone's shoulder, and looking at the subject, whilst keeping the shoulder and head in the shot.
Point of View shot: This is where the camera is acting like the subject and giving the viewer a look at what the subject is seeing through their eyes.
There are also different angles at which the camera could be placed.
These are:
Low Angle: This is where the camera is placed below the subject, giving the impression that they are big and powerful.
Eye range Angle: This is where the camera is straight on to the subject, a if in real life.
High Angle: This is where the camera is placed above the subject, giving the impression that the subject is small and les powerful.
Birds Eye View: This is where the camera is placed directly above the subject, giving 'birds eye view' of the shot.
For example:
'The most common transition is the cut, in which one shot changes instantly to the next.
The next most common transition is the crossfade (AKA mix or dissolve), where one shot gradually fades into the next.
Advanced transitions include wipes and digital effects, where shots whiz about or do complex changes whilst leading into the next.'
(Video Transitions, http://www.mediacollege.com/video/editing/transition/)
Fade to black, this is where the scene fades to a black screen.
Fade from black, this is where the scene is shown from a black screen.
However, even though there are many different tranisitions I could use for my film, I do not think I could fit them in, mainly because as the film is only 15 seconds long, there will not be anough time to allow for me to have transitions and make them look professional. Therefore, I will be only using the cut transition, mainly because I have to make my idea seem exciting and maybe have a twist, and to achieve that effect I will have to use the cut transition.
There are also many different types of shot/angles I could use for my film to get the effect that I would like to achieve.
There are:
Long shot: This is where the whole subject can be seen in the shot.
Mid-shot: This is where the camera is closer then the Long shot, however still having the background.
Close-up: This is where the camera is mainly focussing in on the persons face or any other part of the body, with a lot of detail.
Extreme Long Shot: this can be used as an establishing shot.
Extreme Close-up: This is where the shot is very close to the subject showing more detail then close-up.
Over the Shoulder shot: This is where the camera is placed behind someone's shoulder, and looking at the subject, whilst keeping the shoulder and head in the shot.
Point of View shot: This is where the camera is acting like the subject and giving the viewer a look at what the subject is seeing through their eyes.
There are also different angles at which the camera could be placed.
These are:
Low Angle: This is where the camera is placed below the subject, giving the impression that they are big and powerful.
Eye range Angle: This is where the camera is straight on to the subject, a if in real life.
High Angle: This is where the camera is placed above the subject, giving the impression that the subject is small and les powerful.
Birds Eye View: This is where the camera is placed directly above the subject, giving 'birds eye view' of the shot.
Monday, 3 May 2010


Research on Video editing
For this project we have been set a task of creating a 15 second film with at least 20 edits within it. Therefore, I have decided to look at a few different film trailers to show what kind of editing can be done.
I will show one for an action film, one for a romantic comedy film and one for a comedy. Each of these trailers I have found on http://uk.filmtrailer.com/.
The first one I will analyse is Iron Man 2. After watching the Iron Man 2 trailer and attempting to count how many cuts/edits there were, I found that there were at least 50 edits within the trailer.
Also to make the films seem more exciting and to draw the audience in to want to watch it, the creators have used very fast cut away edits to make the trailer exciting, which consequently will hopefully make the film more successful. Also I have noticed that there aren't many transitions between the shots, which again makes the film more exciting and lively, especially as the film is an action genre.
The second one I am analysing is Sex and the City 2. After watching the Sex and the City 2 trailer, and again attempting to count how many edits/scenes there were again I have to conclude that there were at least 60 edits within the trailer. The transitions within this trailer is different to the first, mainly because of the genre, for example there are cut aways, fade to black and fade from black.
However, in comparison to the other trailer that I have studied I have found due to both of them being different, especially in genres, I had found that each of the trailers had many differences, starting with the cuts, due to the Sex and the City 2 trailer being 2 minutes and 24 seconds and the Iron Man 2 trailer being 1 minute and 51 seconds there were more scenes in the Sex and the City 2 trailers then the Iron Man 2 trailer, however due to the longer trailer the Sex and the City trailer was able to have longer shot within it, which then gave the audience a story to which they would have a basis, if they would like to see the film.
Therefore using these 2 different film trailers I was able to show what kind of trailer techniques the creators use for very different kind of films.
I will show one for an action film, one for a romantic comedy film and one for a comedy. Each of these trailers I have found on http://uk.filmtrailer.com/.
The first one I will analyse is Iron Man 2. After watching the Iron Man 2 trailer and attempting to count how many cuts/edits there were, I found that there were at least 50 edits within the trailer.
Also to make the films seem more exciting and to draw the audience in to want to watch it, the creators have used very fast cut away edits to make the trailer exciting, which consequently will hopefully make the film more successful. Also I have noticed that there aren't many transitions between the shots, which again makes the film more exciting and lively, especially as the film is an action genre.
The second one I am analysing is Sex and the City 2. After watching the Sex and the City 2 trailer, and again attempting to count how many edits/scenes there were again I have to conclude that there were at least 60 edits within the trailer. The transitions within this trailer is different to the first, mainly because of the genre, for example there are cut aways, fade to black and fade from black.
However, in comparison to the other trailer that I have studied I have found due to both of them being different, especially in genres, I had found that each of the trailers had many differences, starting with the cuts, due to the Sex and the City 2 trailer being 2 minutes and 24 seconds and the Iron Man 2 trailer being 1 minute and 51 seconds there were more scenes in the Sex and the City 2 trailers then the Iron Man 2 trailer, however due to the longer trailer the Sex and the City trailer was able to have longer shot within it, which then gave the audience a story to which they would have a basis, if they would like to see the film.
Therefore using these 2 different film trailers I was able to show what kind of trailer techniques the creators use for very different kind of films.
New Brief - Crash Bang Wollop
We got our final brief and we have to create a 15 second film with at least 20 edits within it.
You will use video editing o convey a fast ad stimulating experience. To do this, you will need to make a short film piece that asts no more than 15 seconds. Your piece can either describe an everyday situation in a dramatic or dynamic way or subvert the expected response to a situation.
You will use video editing o convey a fast ad stimulating experience. To do this, you will need to make a short film piece that asts no more than 15 seconds. Your piece can either describe an everyday situation in a dramatic or dynamic way or subvert the expected response to a situation.
Friday, 16 April 2010
The buttons I will be using for my Interface
For the buttons on the interface we had a choice that we had to make, we could either make one button and then share or we could make our own buttons. I decided that I would make my own buttons.
 I was making sure that I was being in keeping with the theme that was set in the brief.
To make my button I decided to have each of the a specific size which was 150 pixels wide by 125 pixels high, this was to show continuity. I also had to make them animated as the viewer rounded over them.
Once i had done them i placed them on my interface and this is what they look like:
I was making sure that I was being in keeping with the theme that was set in the brief.
Tuesday, 2 March 2010
Validating My Work
For this project I also had to validate my html on the Internet using W3C Validator.
http://validator.w3.org/ This way I can see if my website is compliant with the web standards at which the W3C upholds.
Here is a screen shot of my work when I copied and pasted into the correct area on the site.
 Once I clicked on the word validate, I had found that within my code I had got 9 Errors and 1 Warning, (Errors means that you must fix the problem and Warnings means that they advise you to fix the problem).
I had looked through my work and I had tried to fix some of the problems that were accoring. Some were easy some were harder, however when I had tried to fix all of the problems my website worked in Internet Explorer however it did not work in Firefox or Safari, therefore I had to go back and have a look at what I needed to do to correct this error.
When I looked through the coding I had found that some of the conditional comments in my header section that linked my html to the correct css was not correct therefore I had to go back and correct the conditional comment, this then was flagged up again when I again placed it into the validator.
Here is what the errors look like on the site:

They are listed in a very organised way, however, I did not understand some of the problems that I was having and the way that the website had worded the problems, I therefore asked my tutors.
After all of the problems I had fixed all that I could, even though I cannot fix them all I will still be trying to find out what is wrong.
Monday, 1 March 2010
Background Colour Changes
After showing my website to my peers and tutors someone had suggested for me to maybe change my background colour so that the middle area stands out more.
Therefore here are a few screen shots that I have taken to show what variables I have done:


However, after experimenting with different background colours, I had decided to stay with my original idea, this is because I was initially wanting to create a simplistic and easy to understand website, therefore I will be keeping my original design, of the white background.
As demonstrated here:

Saturday, 27 February 2010
Graphics Continued
For my Moods page I did not know which images I wanted to use, and due to the fact that I had created all of my images on my website I wanted to create these as well.
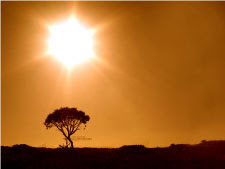
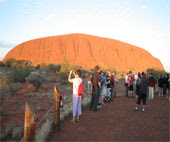
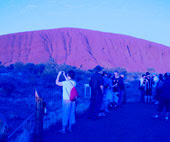 This is an image of Ayres Rock that I had taken about 5 years ago, I chose this image because of the heat that the place has and what I want to achieve at the end.

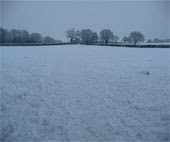 This is a photo of a field that I had taken when it snowed heavily. I chose this image because of how cold snow is, and I want to change the image to achieve the end result.
I first thought about using 2 images that I had found from the internet, the reason that I had chosen these was because I wanted to show how different colours affected the moods of an image or picture.


Both of these images would have been good for this page because both of these are showing how colours affect the moods, however I found that I wanted to use something a bit different.
I therefore decided to use my own images that I had taken myself previously.
 This is an image of Ayres Rock that I had taken about 5 years ago, I chose this image because of the heat that the place has and what I want to achieve at the end.
I have changed the shadows and highlights to blue and I then placed a blue object over the top and I decreased the opacity to 25%, this is to give the illusion that the hot place is actually cold.
I then thought that I would have to do another image however I would do the opposite and use an image that is cold and make it hot.
I then thought that I would have to do another image however I would do the opposite and use an image that is cold and make it hot.

 This is a photo of a field that I had taken when it snowed heavily. I chose this image because of how cold snow is, and I want to change the image to achieve the end result.
I have changed the highlights and the shadows of the image on the left to yellow/red, I also placed a yellow object over the top and then changed the opacity to 25%.
Both of these images I have chosen for a specific reason as I have said before, but the main reason was because I wanted to show how having different colours affect the feeling and the moods of the images, therefore having a very hot place look cold and a very cold place look hot was my goal.
Heading Changes
Due to the feedback that I had from my pitch, I had found that they liked my heading however to make it look better I needed to get rid of the shadow that was behind the colours, the reason for this was so the colours would flow easier and better and they would not be cut off by the black of the shadow.
 I had place a background colour to this so it would be able to fit in with the background colour of my page. Also due to the colours being gradient I had to save it as a Jpeg, and unfortunately Jpeg's do not allow for the background to be transparent therefore I had to place the background in, in order for the heading to match the background of the page.
The original heading was:
 And the one that I changed to was:
I had place a background colour to this so it would be able to fit in with the background colour of my page. Also due to the colours being gradient I had to save it as a Jpeg, and unfortunately Jpeg's do not allow for the background to be transparent therefore I had to place the background in, in order for the heading to match the background of the page.
Subscribe to:
Posts (Atom)