I feel that I have been able to meet the brief and get everything done on time, however I did find this assignment difficult due to the fact that I did not have a Mac at home, and therefore had to make sure that I had finished my film before the half term.
I feel that if we did not have half term then I would not have had to rush, even though I still feel that I like my video and I am proud of what I have achieved.
Tuesday, 8 June 2010
My finished Animatic
Here is my finished animatic, this allowed me to edit my film to the correct length, and also allowed me to edit each clip to a specific time.
My finished Video
Here is my finished video I feel that using the theme that I have chosen I have been able to match the brief, especially because I did not have to use other sounds, and all of them are original.
Production Log 2
Here I have got my production Log for DVD studio pro.
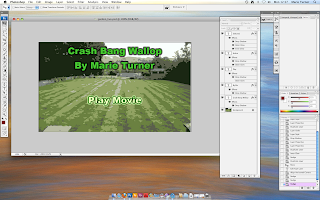 To create the DVD title page I had to make it in Photoshop, this was so I can add different effects to the hover state and the selected state of each of the buttons.
 This is the box that comes up in Photoshop, which I used to create the hover states and the selected states, this gave me the opportunity to make each of the different state different to the last one. After I have finished I then save it as a standard .psd file called ****_live.psd, this is the full layered including the effects, and then resave it out as ****_flat.psd, this means that I had to flatten the layers so that the effects do not show.
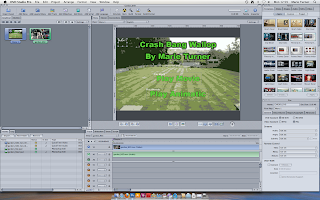 This is the screen at which I see when I open up DVD Studio Pro, this allows me to authorise the DVD and give it a title menu for the beginning. I first have to delete the menu part in the top left box, and then add a layered menu, this allows me to add in the PSD file (the flattened version) and then I place a button box over the top of the buttons this will make them active when it is placed into a DVD player.
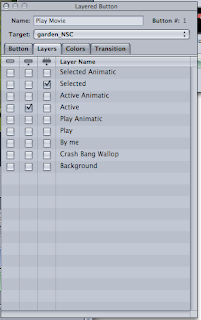 Once I have imported the film, animatic and the psd file I then have to create a new track box next to where the layered menu box is. Here is where I can select the layers that I want to show when the mouse hovers over the writing and when the writing has been selected. To place each of the files into the correct places all I have to do is select them and drag them into the correct boxes.
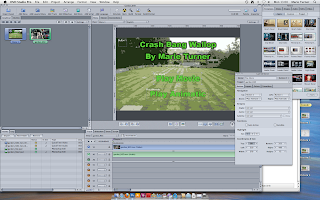 Here is what my first page looks like, and when the viewer clicks on either the Play Movie or Play Animatic they would be taken to the specific page at which I have told the programme to link them too.
Production Log
Here I have my production log, which show you how I made my video, what kind of editing I did, how I made the video background for the DVD studio section.
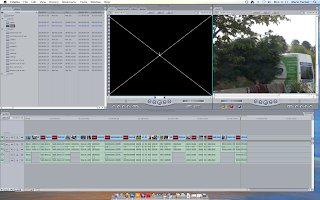 Here I have got a screen grab of what Final Cut Pro looks like as I open it, I first have to import all of the video that I have taken making sure that the video are in the correct format, otherwise it wouldn't work and I would have to use Compressor to put in the correct format.
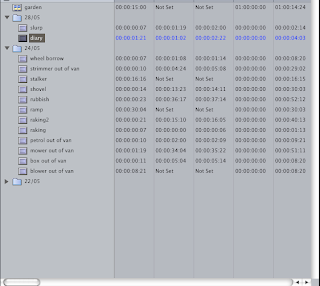 This is another screen grab of where the videos go when you import them, normally the naming would be most the same, and therefore to differentiate between them I would look through each of them and then label them according to what is on them, this would help me in the long run, so I can choose the right video to use.
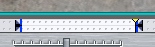 This is the in and out point where on the original videos you can select the points to which you want to then import to the new sequence and add them where they are appropriate. The Keyboard commands are 'i' and 'o'.
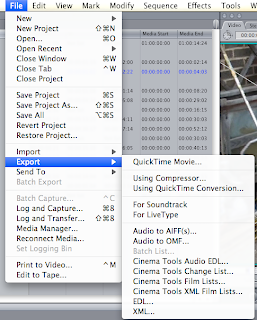 After finishing my full video adding in everything that I would need I then have to export it to a QuickTime Movie, this will then allow me to use it in DVD Studio Pro, as well as play it into Quick Time.
 Here I have got a screen grab of what Final Cut Pro looks like as I open it, I first have to import all of the video that I have taken making sure that the video are in the correct format, otherwise it wouldn't work and I would have to use Compressor to put in the correct format.
 This is another screen grab of where the videos go when you import them, normally the naming would be most the same, and therefore to differentiate between them I would look through each of them and then label them according to what is on them, this would help me in the long run, so I can choose the right video to use.
 This is the in and out point where on the original videos you can select the points to which you want to then import to the new sequence and add them where they are appropriate. The Keyboard commands are 'i' and 'o'.
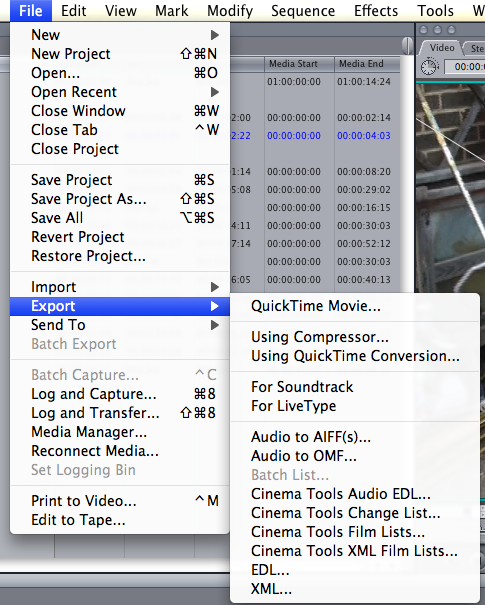 After finishing my full video adding in everything that I would need I then have to export it to a QuickTime Movie, this will then allow me to use it in DVD Studio Pro, as well as play it into Quick Time.
Saturday, 5 June 2010
Things that I will film
Here are a list of things that I could film and then put into my video:
Ø Getting tools out of van
o Lawn mower
o Strimmer
o Blower
o Rake
o Loppers
o Spade
o Shovel
o Concrete Breaker
o Have each of them laid out on the ground by the end.
Ø Lawn Mowing
o Starting mower and using it.
o Starting Strimmer
o Starting Blower
Ø Hedge Cutting
o Getting hedge cutter going
o Cutting hedges
o Clearing up
Ø Turfing
o Rolling out turf
o Watering
Ø Fencing
o Banging in posts
o Mixing concrete
Ø Sleepers
o Drilling screws in
o Banging in posts
o Putting in soil
Ø Planting
o Watering
o Making hole in ground
o Filling hole with soil
Subscribe to:
Comments (Atom)